Indeed, for anyone brand new to Windows 8, anyone who's already familiar with an earlier version of Windows, that tile-based interface can be startling, confusing, and ultimately very frustrating.
Can you learn it? Sure. Should you have to? No. With a few simple steps, you can make your new Windows 8 PC much more familiar, both in look and operation.
1. Forget that Metro exists
Windows 8 may boot to its fancy new digs, but you've got work to do. For now, I recommend switching to Desktop mode (which might as well be called "Windows 7 mode"), where it's much easier to install and access your favorite software.
You can return to Metro anytime you want to learn your way around, mess with apps, and so on. But during this transitional period, stick with Desktop.
To get there, just click the Desktop tile which should be in the lower-left corner of your tile collection), or press Win-D (that's the Windows key and letter D).
2. Install a Start button
Once you get to the Desktop, you'll notice there's no Start button. Rumor has it Microsoft's forthcoming Windows 8 update will give you the option of restoring it, but until then, third-party software to the rescue.
I'm partial to Win8 StartButton, a free utility that gives you a choice of Start-button themes (including all the old favorites). That's one huge hurdle overcome.
3. Boot straight to Desktop
In keeping with that whole forget-Metro-exists philosophy, I recommend booting straight to Desktop mode. That saves you the hassle of having to land in Metro, then click the Desktop tile.
I recommend Digital Volcano's Duplicate Cleaner Free. The attractive, three-tab interface allows the program to provide plenty of options without overwhelming you.
When preparing Duplicate Cleaner for scanning your drive, you can have it examine or ignore file content. You can tell it to consider files with the same name, with similar names, or to ignore names completely. It can also match files by the Created and Modified Dates. A special Audio Mode tab helps you find duplicates of the same song by title, artist, and other such data.
Click for full size
If your hard drive is so overloaded that you hesitate to install even a 5MB program like Duplicate Cleaner Free, go with this old but still workable version of Easy Duplicate Finder. It's portable. You can download it on one computer, put it onto a flash drive, insert the flash drive into your PC, and run it without putting anything on the hard drive. It's not as versatile and easy to use as Duplicate Cleaner Free--or for that matter, as the current version of Easy Duplicate Finder, which is a reasonable alternative to Duplicate Cleaner.
But this old, portable version is not difficult either, and it works. It also has, oddly enough, an icon that makes me think of a public restroom.
Either of these programs should help you free up significant drive space--although you will have to face some decisions that only a human can make. Taken From
assuming you're saving and sharing those photos as .jpg files. And that gives you an advantage, because jpegs have captions build in as part of the format's metadata.
Metadata is a particular kind of data that explains a file's content, and most file types contain their own metadata fields. For instance, a jpeg's metadata includes the camera model, resolution, the date the photo was taken, and other bits of information. To view and potentially change a file's metadata, right-click it, select Properties, and click the Detailstab.
If you want to add a caption to a photo, use the jpeg format's Title field--the very first one on that Details tab. Point the mouse cursor to the blank space to the right of the word Title. A field will appear; click there and type your description.
If you're new to Windows 8, I suspect you're finding certain things confusing. (Never mind the lack of a Start button; that's been covered to death.)
For example, if you're using the Metro UI (i.e. the new Start screen with all the tiles), you've undoubtedly installed some apps. That's half the fun, right?
Okay, but what happens when you want to remove an app? It's not immediately obvious. If you pull up the Charms Bar and tap Settings, no help there. If you tap the Change PC settings link, you'll find no uninstaller there either.
Well, there's always good old Control Panel, right? Wrong: When you get there, you'll see that apps aren't listed. Guess they're not "programs" in the traditional sense.
As it turns out, if you're operating Windows 8 with a mouse, it's a snap to uninstall an app: Just mouse over its tile, right-click, and then choose Uninstall from the options toolbar that appears at the bottom of the screen.
"Windows 8 on a desktop." The very phrase makes some people recoil and instinctively mouse over their Start buttons.
It's too bad that the modern UI has proven so contentious, because aside from the eye candy—or eye cancer, depending on your perspective—an abundance of welcome nuts-and-bolts changes makes Windows 8 the hands-down best version of Windows that Microsoft has ever released.
But don't despair. Although you can tweak and tuck a few things to almost completely banish the interface formerly known as Metro from your Windows 8 life, you can also try another tactic: not upgrading at all. Many of Windows 8's best under-the-hood improvements can be yours in Windows 7 with the help of a few handy-dandy applications.
Having your cake and eating it too has never tasted so sweet.
Improved file copying and moving
TeraCopy: Unassuming, yet oh-so-awesome.
Not to brand myself as a geek, but Windows 8’s file-copy dialog box may be its biggest desktop improvement. It brings all copying and moving processes into a single window, tosses in a pause button, deals with file conflicts more intelligently, and is just plain fasterthan before.
The file copier built into Windows 7 isn’t very good by comparison. In fact, while introducing Windows 8's file-copying tweaks, former Windows president Steven Sinofsky wrote that "most people do not have a great tool for high-volume copy jobs,” as so few users have a third-party file-copying tool installed on their Windows 7 systems. Yes, the Windows 7 file copier is just that meh.
You can improve file copying and moving without upgrading to Windows 8 by installing the utterly superb TeraCopy. This utility not only speeds up some file transfers, but it also allows you to pause transfers, a tremendously convenient improvement over Windows' default functionality.
That's not the only useful trick up TeraCopy's sleeve, though. Rather than halting transfers completely when an error occurs (as Windows 7 so frustratingly does), the program skips over problematic data and instead displays troubled files for your perusal at the end of a mass data migration. Even better, TeraCopy sports Windows shell integration, allowing you to completely replace Windows Explorer’s normal copy, paste, and move functions with TeraCopy's excellent alternatives.
A better Windows Explorer
I get it—five years after its debut in Office 2007, the Ribbon interface is still polarizing. But there’s a lot to like about File Explorer, as the Ribbon-ized version of the traditional Windows Explorer interface has been dubbed in Windows 8.
For one thing, the Ribbon provides easier access to less-used functions, such as toggling the display of hidden files. Windows 8's File Explorer also restores the much-loved Up button that Windows Vista and Windows 7 both lack, giving you an easy, one-click way to go up a directory.
The new File Explorer even allows you to mount ISO disc-image files by double-clicking them, an awesome feature that eliminates the need for third-party ISO-mounting software.
Better Explorer and WinCDEmu: Two great tastes that taste great together.
If you want to spiff up Windows 7's Windows Explorer with a Ribbon and an Up button, your best option is Better Explorer. This utility actually packs in more functionality than Windows 8's File Explorer does, thanks to its ability to display multiple open folders in tabs at the top of the window. This makes wrangling files a breeze compared to Windows' usual multiwindow madness.
Interested? Just pin Better Explorer to your taskbar, and then forget that Windows 7's default Windows Explorer even exists. To use TeraCopy with Better Explorer, you’ll need to go into Better Explorer’s options and enable the Allow third-party file operation replacements checkbox on the Shell screen.
Install WinCDEmu if you want to mimic Windows 8's ISO-mounting ways. It’s a dead-simple program that allows you to mount ISO files and other types of disc images easily just by double-clicking them. You'll find no faster, easier way to access digital copies of physical discs.
A more powerful task manager
Process Explorer ain't pretty, but it's a power user's dream tool.
No two ways about it: Windows 8’s task manager is awesome. It’s the most powerful task manager ever included with Windows, and it comes stuffed with stellar features and enhancements, such as the ability to restart explorer.exe with a single click, a vastly improved performance-monitoring tab, and a tool to manage your startup programs. (Microsoft should have added that last feature to Windows a decade ago.)
You won't find a program that exactly mirrors Windows 8's myriad task manager tweaks. But if you want an advanced task manager packed with powerful features, try Microsoft’s own Process Explorer. It’s a bit more complicated than Windows 7’s task manager, although it’s also easier to use in many ways. For example, Process Explorer shows your processes in a tree view so that you can see how they’re related to each other. This view comes in handy if you’re trying to determine which Google Chrome process launched the 50 other Chrome processes running on your system.
If you prefer Process Explorer after giving it a whirl, you can make it your default task manager by opening its Options menu and selecting Replace Task Manager. Easy!
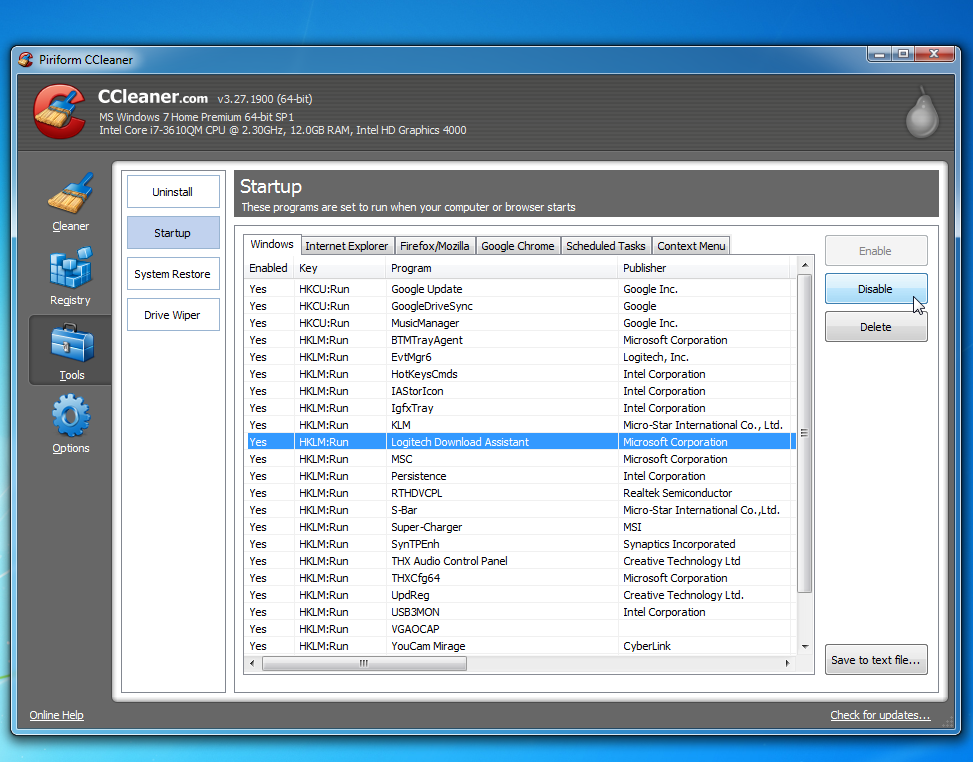
CCleaner's Startup tab.
To manage startup programs, you can turn to the ever-useful CCleaner application—if you read PCWorld how-to articles regularly, you probably already have it installed. You’ll find CCleaner's startup manager under Tools > Startup.
If CCleaner isn’t enough for you, tryMicrosoft’s own Autoruns tool. It’s the most comprehensive way to view and manage programs that automatically start at boot-up. Autoruns is definitely more complicated to use than the default tool built into Windows 8's task manager, but it also shows many more granular entries that CCleaner and Windows 8’s task manager don’t.
Integrated antivirus protection
Microsoft finally took some responsibility for security in Windows 8 and bundled an antivirus program dubbed Windows Defender with the operating system. Despite the different name, however, Windows Defender is basically the default Windows Firewall paired with Microsoft Security Essentials, which is freely available as a Windows 7 download.
Windows 8 boots much, much faster than Windows 7 does. Seriously. It's like greased lightning. Microsoft achieved this by putting Windows 8 in a sort of hybrid state where the base kernel session is actually hibernating, as opposed to undergoing a full shutdown.
So, if you want Windows 7 to boot up faster, just use your computer’s hibernation option rather than turning it off all the way. Better yet, leave it in sleep mode when you’re not using it—sleep mode uses only a small amount of power, and your computer will resume in a second or two when you're ready to use it.
What, that's still not fast enough for you? Buy a solid-state drive. Since upgrade copies of Windows 8 cost $120 for the base version all the way up to $200 for Windows 8 Pro, it's possible to upgrade your computer to a blazing-fast SSD for less than you'd pay for a copy of Windows 8. SSDs offer tremendous performance improvements over platters of spinning rust (aka mechanical hard drives) in transfer times, access times, and operating system startup times alike.
It’s not as if Windows 8 is much faster in real-world use, anyway. You may see some battery-life improvements, and the desktop may feel a tad snappier—when the Start screen isn’t swallowing it whole and getting in the way, that is—but benchmarks have shown thatPC games play at about the same speed on Windows 7 and Windows 8 .
Windows 8 may be a bit less RAM-dependent than Windows 7, but if you run into RAM problems, you should just buy some more RAM. Memory is dirt cheap these days, and a heck of a lot cheaper than Windows 8. You can get 8GB of RAM, which is more than enough for the average PC user, for less than $50 online. A standard 4GB kit costs right around $30.
Imitation is the sincerest form of flattery
Yes, you can have it all.
And with that, your Windows 7 PC now has many of the vaunted nuts-and-bolts improvements introduced in Windows 8, only without all the glittering live tiles. If you're in the mood for continued tinkering, check out PCWorld's How to Get Windows 8 Features Now, which details programs that can mirror some of Windows 8's aesthetic changes, such as improved multimonitor support and the aforementioned live tiles.
With Windows 8 pushing a “touch-first” desktop interface—Microsoft’s words, not ours—and with Valve’s Steam on Linux beginning to bring much-needed games and popular attention to the oft-overlooked operating system, there’s never been a better time to take Linux out for a test drive.
Dipping your toes into the penguin-filled waters of the most popular open-source ecosystem is easy, and you don't have to commit to switching outright to Linux. You can install it alongside your current Windows system, or even try it without installing anything at all.
Ubuntu is the most popular Linux distribution for desktop and laptop Linux users, so we’ll focus on Ubuntu throughout this guide. For the most part, Ubuntu just plain works. It sports a subtle interface that stays out of your way. It enjoys strong support from software developers (including Valve, since Steam on Linux only officially supports Ubuntu). And you can find tons of information online if you run into problems.
When you buy an ebook from Amazon, it's yours, right? Technically speaking, Amazon is merely licensing the book to you. And the company can, seemingly on a whim, close your account and delete all your books.
This isn't likely to happen, but it gives me pause. Indeed, it makes me want to back up the books I bought and paid for, just in case. What's more, if I ever decide I want to read those books using, say, another reader (be it an app or device), I'd like the option of converting them to another format.
Both options require the removal of Amazon's DRM -- the digital lock the company puts on its books to prevent unauthorized sharing.
I have no intention of sharing. I simply want to exercise my fair-use rights. Luckily, it's possible to remove Amazon's DRM (at your own risk, of course) using free book manager Calibre and a couple plug-ins.
Windows 8's tile-based interface puts a bold new spin on the familiar Windows interface—so bold that many long-time Windows users are threatening to jump ship to another operating system rather than learn Microsoft's "modern" UI. Of course, you'll still find yourself in foreign territory even if you actually follow through and make the jump. Installing a new operating system is easy, but wrapping your head around an alien environment can be more difficult, even if you're using a comparatively user-friendly OS like Ubuntu Linux.
Luckily, Linux is customizable—much, much more than Windows. In fact, if you're having trouble with the transition (or plopping Ubuntu on a parent's PC), you can tweak and tune the OS to feel pretty darned close to the Windows environment you've forsaken.
I’ll go through two methods here. One adapts Ubuntu’s default Unity desktop to make it feel slightly more like Windows, while the other entails a bit more work and a different desktop interface entirely to create a truly Microsoft-like experience.
In a world exploding with tablets and touchscreens, Microsoft's decision to saddle Windows 8 with the finger-friendly Modern interface formerly known as Metro makes a lot of sense—for Microsoft. But if you're among the majority of Windows users who aren't using a tablet or a touchscreen, the focus on Live Tiles and mobile-centric apps is more of a frustration than a feature. Vexingly, Windows 8 is riddled with sneaky ways to drag you out of the desktop and dump you on that shifting, shiny Start screen.
Windows 8 and its controversial interface will come preinstalled on practically every computer sold over the next few years, but fear not! Die-hard desktop jockeys don't have to learn to stop worrying and love the Live Tiles.
Here's a step-by-step guide to banishing the Modern interface from your Windows 8 life. Once it's gone, you might just come to appreciate Windows 8 even more than you do Windows 7. I have.
Drivers are a very important part of your computer. These little pieces of software make link our hardware to our software, applications, or operating system. Without them, Windows will not work correctly because it cannot communicate to your hardware.
Visit the Driver Manufacturer website Most driver problems can be solved by going directly to the manufacturer's website and downloading then installing the latest driver for that device. This will update the drivers and get your hardware functioning properly again.
Restart Your Computer After the installation was completed, make sure that you restart your computer. If problems appear after an update, you should roll back the hardware driver.
Reinstall a Device Driver If you are facing hardware issues, one of the first steps you should take is to reinstall the hardware driver. In many cases this will solve your problem. When you do this, Windows automatically detects and installs the hardware, like new. To do this, go to "Device Manager" on your Windows machine and select "Confirm Device Removal".
Try an Automated Driver Tool Automated driver updaters such as Driver Detective or Driver Robot, offer a free evaluation version which allows you to scan your PC for missing drivers at no cost. If your missing drivers are found, you can register and for a small fee install the drivers automatically and receive unlimited driver updates. This is not a bad option especially if you cannot locate the driver you need manually.
Rolling back a Driver This is a very easy process and there is nothing unsafe about it. To roll back a device driver means to revert to the old version. Windows will use the previous version of your driver.
Don't you feel like crying every time you add another disc to your pile of scratched discs. Trashing that disc which contained your favorite songs, pics, files, games or videos is not easy.
Read-on, if you find yourself wishing for a miracle every time your fav CD is scratched:
Home Remedy : here's an easy home remedy, which might give you the desired results. Rub a small amount of toothpaste on the scratch and polish the CD with a soft cloth and any petroleum-based polishing solution (like clear shoe polish). Squirt a drop of Brasso and wipe it with a clean cloth.
Technology to the rescue There are many softwares available on the net, which enable the recovery of the CD data. BadCopy Pro is one such software, which can be used to recover destroyed data and files from a range of media.
Just a few clicks is all it requires to recover the disc from almost all kind of damage situation; be it corrupted, lost data, unreadable or defective.
DiskDoctors is another popular company, which offers both software and solutions to recover data from a scratched CDs and DVDs.
General Tips: * Always wipe the CD from the center outward with stratight spoke-like strokes. Wiping CDs in circles will create more scratches.
* Do not scratch the graphics layer as you cannot repair the disc. HINT: Hold the disc up to a light with the graphics layer facing the light source. If you can see light thru the scratches at any point then the disc may be irreparable and or exhibit loading or playing errors.
* Clean your Disc players lens regularly with a suitable product to ensure optimal viewing pleasure.
* Make sure to use a soft, lint-free cloth to clean both sides of the disc. Wipe in a straight line from the centre of the disc to the outer edge.
* If wiping with a cloth does not remove a fingerprint or smudge, use a specialized DVD disc polishing spray to clean the disc.
* Only handle the disc by its outer edge and the empty hole in the middle. This will help prevent fingerprints, smudges or scratches.
Statistics: *Fingermarks/prints cause 43% of disc problems! * General wear & tear causes 25% of disc problems! * Player-related issues cause 15% of disc problems! * User-related issues cause 12% of disc problems! * PlayStation 2 machine scratches cause 3% of disc problems! * Laser rot (a manufacturer error) causes 2% of disc problems!
1. Gather your image and the files you wish to lodge into it. Here I have a meeting.txt which which I will slap inside my picture secret.jpg . put the files inside folder hidden (eg.) as shown below
2. Add the files you want to hide into a new RAR archive eg. meeting.rar
3. Open Command Prompt by typing cmd in RUN and type the following command (this is just example . comand depends on where you create the file) >cd.. >cd.. >cd hidden >copy /b secret.jpg + meeting.rar lizard.jpg where secret.jpg is the original picture, meeting.rar is the file to be hidden, and lizard.jpg is the file which contains both. as shown below
4 . so the new picture lizard.jpg which contained the hidden file is created
When you view the picture you will see only the picture (not the hidden file). To see the the hidden file inside the picture change the file extension from .jpg to .rar and extract it. You can use this method to hide some files from average user.
1. WindowsXP has a new feature called Prefetch. This keeps a shortcut to recently used programs. However it can fill up with old and obsolete programs. To clean this periodically go to: Star / Run / Prefetch Press Ctrl-A to highlight all the shorcuts Delete them
2. Increasing System Performance If you have 512 megs or more of memory, you can increase system performance by having the core system kept in memory. Start Regedit Go to HKEY_LOCAL_MACHINE -> SYSTEM -> CurrentControlSet -> Control -> Session Manager -> Memory Management -> DisablePagingExecutive Set the value to be 1 Reboot the computer
3. Increase hard disk speed Run SYSEDIT.EXE from the start & then Run command. Expand the system.ini file window. Scroll down almost to the end of the file till you find a line called [386enh]. Press Enter to make one blank line, and in that line type Irq14=4096 Note: This line IS CASE SENSITIVE!!! Click on the File menu, then choose Save. Close SYSEDIT and reboot your computer.
When u run your computer (windows) sometime you might feel that your computer was run slowly. It might because of the memory is almost reach it capacity. There's a solution how to clear them without restarting your computer.
1. Right click on an empty spot on your desktop and select New - Shortcut. 2. Type %windir%\system32\rundll32.exe advapi32.dll,ProcessIdleTasks in the box. 3. Click Next. 4. Give your shortcut a nice name like “Clear Memory”. 5. Click Finish and you’re done.
Now, if your computer start to run slow just double click this shortcut. And your computer will refresh again !!
1. IE Tab: If you use Firefox as your primary browser, you probably get stymied occasionally by Web sites that don't look right in its windows. Don't fire up Internet Explorer (which maintains a separate history and won't have your bookmarks); instead, use the IE Tab plug-in to instruct Firefox to temporarily use Internet Explorer's rendering engine. IE Tab resides in the bottom right corner of your browser. Click the Firefox icon to switch to IE mode and vice versa.
2. Duplicate Tab: Want a copy of the current window you're visiting, complete with the history of that browsing session? IE users can accomplish this without having to install and use a plug-in: Press Ctrl-N to open a new window with the entire history of the current window. For Firefox users, Duplicate Tab lets you obtain such a history with a single shortcut keystroke; or you can use the tool to merge multiple open windows into a series of tabs.
3. ErrorZilla: The standard "server not found" page is useless if you're looking for a Web site that's gone AWOL. ErrorZilla adds a series of buttons to the bottom of the standard "Firefox can't find the server" message, providing instant access to the Wayback machine, Google Cache, Whois lookup, and more.
4. Inline Search: IE users can obtain search-as-you-type functionality that works the same way it does in Firefox with this free, simple extension.
5. Extended Statusbar: This plug-in supplements the data that Firefox provides about a Web page and your Internet connection, providing such details as the total size (in KB) of the page, the transfer speed, and the load time.
Web browsers--especially Firefox--are built with plug-ins in mind. Thousands of these code snippets are available, but here we present some of the most useful add-ons, plus a few tips that don't require any extra code.
Nuke Web ads: Though decried by many Webmasters for cutting into a lucrative revenue stream, Adblock Plus is practically a mandatory addition to Firefox, due to an increasingly onerous glut of Web advertising. (IE users can try Ad Muncher free for 30 days and then pay $30) Put simply, Adblock Plus blocks ads--not just pop-ups, but regular banners, towers, rich-media stuff, and Google's ubiquitous advertisements. Adblock Plus doesn't stop everything, but it nabs enough that you'll notice the difference immediately.
Many PCs, one set of bookmarks: If you use numerous computers, you have undoubtedly had to deal with separate browsers on each of those PCs, each with its own set of bookmarks that must be managed separately--unless you have a bookmark synchronizer, that is. Foxmarks is one of a number of tools that can sync Firefox bookmarks among multiple machines. Just install Foxmarks as an add-on to the Firefox installation on each system, and never worry about manual syncing again. As a bonus, you can access your bookmarks on the Foxmarks Web site, too. FireFTP transforms Firefox into a full-blown, speedy, two-way FTP application. Click here to view full-size image.
Put an FTP app into Firefox: Even the most casual Web developer needs an FTP application, but many of these are cumbersome and unintuitive--and they require installing yet another full-blown program. FireFTP turns Firefox into an impromptu and speedy two-way FTP application. Once installed, FireFTP appears in the Tools menu. Click it and a new FTP tab opens up, offering a simple two-pane system that lets you easily copy files between your desktop and your remote site. FlashGet tracks all your downloads, regardless of the specific application. Click here to view full-size image.
Get a handle on downloaded files: If you are a download junkie who always has something in the queue to leech off the Web, you need a download manager to help handle everything. FlashGet is a free and extremely popular download manager that can help you organize and queue up HTTP, FTP, BitTorrent, and other types of downloads, working in the background and letting you pause and resume downloads. It can even tell your computer to shut itself down when the downloading is done. Works on any browser.
Restore embedded passwords to IE URLs: Several years ago, Microsoft disallowed Internet Explorer to use an embedded password as part of a URL (of the format https://username:password@server.com) when a user goes to a protected Web site; instead the person must type in the password manually at the pop-up log-in screen. (This restriction was a response to phishers' employing phony password fields to deceive unsuspecting users.) Restoring IE's original ability takes a Registry tweak. Run Regedit and browse to the following Registry key: HKEY_LOCAL_MACHINE\Software\Microsoft\Internet Explorer\Main\FeatureControl\FEATURE_HTTP_ USERNAME_PASSWORD_DISABLE
Here, create two new DWORD values: iexplore.exe and explorer.exe. Leave the default DWORD value for each of these at '0'. Restart IE.
Grab a hard copy of any Web page: Did you ever print a hard copy of a Web page only to have it come out garbled, missing images, and otherwise nigh unreadable? One reason that may happen is because the newfangled Web 2.0 standards don't play well with 0.1-era printers. Solution: Grab a screen shot of a Web page, and select Print. But how do you do that, when a single page has enough content to fill up three display screens? Simple: Install Screengrab for Firefox, which lets you save a full page, the visible portion of a page, or just the tidbit you'd like to keep. IE Screenshot performs similar tricks for the Microsoft browser. Save images as digital files or print them out.
If you still think that you need macintosh computer to try MacOS, that's already in the past. Now you can try MacOS on Windows Vista. How to do it ? Check this out !
First thing that you need to do is you need to have VM Player that can be download from VM Player Free and of course DVD installer MacOS X version 10.4.5 or 10.4.6 or 10.4.7 or 10.4.8.
1. Run VM Player, Start -> All Programs -> VM Ware -> VM Player. 2. Create new virtual machine, by click New Virtual Machine. 3. Then click next 4. Then choose Custom, and click next then next again. 5. Then choose Other and FreeBSD for the version. For Core 2 Duo and Core Duo user with 945 pm (Calistoga) you need to choose Windows NT. This step is needed to prevent the processor to failed in boot DVD MacOS. Then click next. 6. Give your new virtual machine with MacOS for easier identification. 7. Then answer one, if there is a question that asked you about how many virtual processor that will be created. (Still answer one although there are 2 processor on your computer) 8. Then you need to set how many memory that you will allocated for MacOs, you suggest to set it to 256 mb ( 512 mb from 1.5 gb is very recommended). Then next. 9. Then choose [Use bridged networking] and next then next again. 10. Then choose create new virtual disk and next. 11. Then you need to set what kind of your virtual disk, IDe or SCSI. Then next. 12. After that you need to set the capacity of your new virtual disk. 13. After you click next, you need to decide where your virtual disk will placed. Choose place that different with place where your main operation system place, 14. Then click finish, and close VM window. 15. Now you need to open windows explorer, and find VM ware setting. The default location is on Documents\Virtual Machines\MacOS X. Then open configuration file ( with .vmx) using notepad. 16. Add paevm=”true” on the last row. If with this configuration failde to boot virtual machine, you can change scsi0.present = “TRUE” with scsi0.present = “FALSE”. 17. Save the configuration .vmx file. 18. Now insert DVD MaacOS and Power On This Virtual Machine. 19. When booting MacOS take process, press F8 and type -v. This will bring you to verbose mode, that will make easier to detect if there is something wrong with the installation. 20. After GUI (graphical user interface) screen appear, follow step by step until you need to choose hard disk. Click Utilities, then Disk Utility. 21. Choose VM drive on the left panel, and partition on the right panel. 22. Change partition volume to 1 and give it a name. Make sure that format will be created is Mac OS Extended (Journaled) and make sure that the space is sufficient. 23. Click partition and click partition ones again. After your disk formating is finish, you can close Disk Utility window and your partition will show up on set up page. Continue to next instalation step. 24. If you use Intel processor with SS2, make sure you choose customize and put a check mark on patch. 25. After you only need to click continue and wait until instalation process finish. And you can enjoy Apple operation system on Vista.




 2. Add the files you want to hide into a new RAR archive eg. meeting.rar


